The airbrush is, without any doubt, the most important tool to reach the best result in our modelling works. Many models get ruined in the painting process, sometimes it happens because of not knowing how to use the airbrush properly, and sometimes it is because we don’t have that absolutelly needed tool.
It is very usual that the first times when we are fronting airbrush works we don’t know exactly what to do and how to paint with the airbrush. Now we bring you 20 basics for any modeller who wants to get started using the airbrush. We are sure that if you follow them, it is going to be really easy for you to do your first works.
Let’s go!
1. Using modelling paints, because its formulation has a thinner pigment, suitable for airbrushig with 0.15 to 0.4 mm nozzles.

2. The paint has to be enough thinned, this is very important in order not to collapse the airbrush. It is advisable to use the thinners recommended by each brand, because they are prepaired to get the best result with each brand. It is true that some paints work perfectly thinned with alcohol, water, etc., it is much better to start with the “oficials” and make our own experimentation in the future projects.
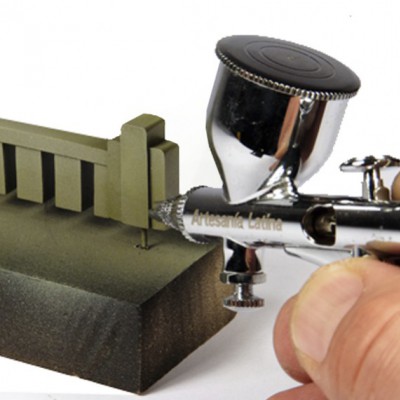
3. The correct way to use an airbrush is the shown in the image below, the fingers shape is similar than holding a pencil or a brush. The index finger activates the lever. Many starters prefer to hold the airbrush in a way that the trigger is activated with the thumb finger, although it looks more confortable in the beggining, the control and precission is much lower and the movements are very limited.

4. It is advisable to start an airbrushing session by spraying water, to check that it is expelled correcly. When starting to paint, it is also recommendable to start from very thinned mixures, and add paint until we get the optimal dilution, that way we avoid to collapse the airbrush with a veri thick paint, and we have to throw paint, clean, etc. The paint needs to have a consistence similar to the milk. We must make some tests on white paper. When we have some experience, we will know the correct proportion for each kind of paint, and we will be able to delete this step.
5. In my experience, the most easy way to prepare the paint is to start putting the thinner into the airbrush deposit, in the needed proportion, and then the corresponding amount of paint. We have to mix it with a brush prepaired for this and that is ready. We have to consider than we have to do the first spraying apart of the model piece that we are going to paint, because there is always a small amount of thinner almost without paint in the closest part to the nozzle. When we use a bigger amount of paint, we prepare the mixure in a recipient apart, and we put into the deposit the amount needed with a dropper. In this kind of pots with screw cap (or recycled paint pots), the paint is preserved without problems for a long time.

6. The combination between pressure, paint and thinner, the airbrush and the nozzle/needle used are the keys to get to the real good airbrushing work. These parameters have to be “calibrated” by the modeller, in order to get to the optimal conditions for the work. For e4xample, if we work with a 0,2 mm nozzle and low pressure, we would have to thin a little more the paint, that if we use a higher pressure and a 0,3 mm nozzle.
7. The front part of the airbrush has to be always in a slightly sloping down position while we paint, to help the paint to get out and avoid the paint reflow in the back areas of itself. In two-action airbrushes, first of all we will spray some air, and little by little we will spray paint. When we finish each pass, we will stop spraying paint and finally we will stop the air. This way the first and last that gets out from the airbrush on each pass is air, that will avoid the accumulation of paint in the nozzle that can get dry and obstuct it.
8. We should practice the optimal distance between the airbrush and the painting surface. This distance will not be always the same, because it changes depending on the tecnic, pressure, amount of air and paint wich we are using. If we get too close we will see that the surface gets an excess of paint, making irregular surfaces or the typical “spider legs”. If we paint from too far, we will loose control on the areas we are painting and there is possible than the paint gets dry before getting in contact with the model, making the effect known as “orange skin”.

9. We have to check the final part of the needle and the nozzle when we are painting, if we see that the paint is accumulating, we have to remove it with a tissue with thinner, alcohol, water, etc. This way we will avoid that the air pressure spits this paint on our model.
10. If, during an airbrushing session, we are goign to use different colors, the right mode if it is possible is to start with the ligher color, and finish with the darker, spraying between each color with cleaning liquid. Tis way we avoid to disassemble and clean the airbrush.
11. The most recommendable on airbrushing works is to use distilled water, because it doesn’t have salts and it doesn’t let residual content in the airbrush. In the most part of supermarkets we can buy carafes of this water for a few money.
12. Having anairbrush holder is essential, because it let us to put the airbrush in a safe position, and having both hands free. The holder has to be placed in the same side that we are using the airbrush (our right side if we are right handed). Not having this holder ussually ends up with all kind of accidents: spilled paint, airbrush falls, etc.
13. In the end of each airbrushing session, we will empty the excess of paint left in the deposit and we will proceed to spray the cleaning liquid on a paper or tissue untill the liquid is transparent. After that, we have to disassamble the needle, the nozzle and the color cup (in case of being disassamblable).
14. We must clean the metallic areas without joints with an absorbent towell (we must try to use a good quality wipe in order not to let any residue) impregnated with acetone or cleaning liquid, depending on the paint that we have used before. In the same way, we have to clean the inner conduit from the airbrush between the deposit and the nozzle. In this area it is very recommendable to use airbrush cleaning brushes, because it makes the work much easier. The cleaning is an essential work that we have to do after each airbrushing session. There are not too many things more frustrating than starting an airbrushing work and realize that the airbrush is dirty, the paint doesn’t come out, it makes bubbles or it comes out intermittently.
15. The areas with rubber joints, should not be cleaned routinely with acetone or thinners, because they wear them down quickly. We must just clean them on deep cleanings.
16. The nozzle is the most susceptible part to suffer paint obstructions, and it is the most difficult to clean. There are cleaning needles for this work. We also can use a thin brush impregnated with cleaning liquid or acetone.
17. Once it is clean, we will leave the airbrush unassembled (in a safe place) in order to let every piece dry up separated from the others. This way we will make sure that if there is any rest of paint in the inside parts, the needle doesn’t gets stuck and we will have problems in the following painting sessions.
18. Depending on the use we will make to the airbrush we will have to do a full cleaning often. In these cases, we unassemble the airbrush completely and we will do the cleaning with the proper products. If we have available an ultrasound equipment, we will get a better cleaning in the hard acces areas, but we will never stop doing the manual cleaning, although it is quicker.
19. En los desmontajes del aerógrafo aprovecharemos para revisar el estado de las zonas más delicadas:
When we unassemble the airbrush, we will check the state of the most delicate areas:
- O-rings – Over time they will wear out or break, and we will have to replace them.
- Needle – The tip must remain perfectly straingt and sharp.
- Nozzle – The output must be perfectly round and without fissures or deformities.

20. The moving parts from the airbrush (mainly the trigger and the piston wich activates the air flow) must be greased regularly with specific airbrushing lubricant.
We take this opportinity to leave you a link to our airbrushing section, where you can consult information about a huge range of airbrushes, compressors and accesories wich will help you on your works:
If you have any doubt or suggest about this post, leave us your comment and we will answer as soon as possible.


